Note: This article is a bit heavier on the science than what I typically put out. BUT understanding WHY tendinopathy occurs is vitally important to properly rehabbing them. Please thoroughly read this before implementing it with yourself.
As clinicians, there are some injuries and dysfunctions we see more commonly than others. Tendinopathy ranks high on the “most frequent” list when working with an active population. It seems like there is never a shortage of people coming into the clinic with Achilles pain after starting a new running program, or patellar tendinitis soon after volleyball season begins.Hopefully, this will help many of you and your athletes get back to smashing goals and PRs.
.
What is Tendinopathy?
Tendinopathy is hard to define, and very difficult to deal with (especially if YOU are the one dealing with it). It can present at any age and among any population, regardless of sport or athleticism.
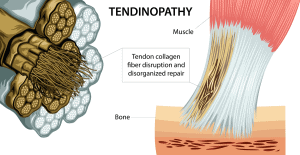
Dr. Jill Cook, one of the primary researchers in this field, describes tendinopathy as an “overuse tendon injury”. It results in “pain, decreased exercise tolerance of the tendon, and reduced function.”1 She also goes on to say that the “overuse” aspect of this disorder can be HIGHLY relative term. Tendons that are also chronically UNDERUSED can also become degenerative and painful. Clinically speaking, this is spot on. The reason people seek treatment and help for this is almost always pain and reduced function.
The cause is almost always related to volume and load: too much or too little.
The majority of times we assess an athlete with tendinopathy, changes in training volume will be seen. Often this is a spike in squatting volume after starting a squat cycle. Or shoulder issues arising after weeks of working on their muscle-up technique.
For more in-depth discussion on training volume management and assessment, check out this article.
It is important to note that tendonitis (an inflammatory condition) does exist and cause tendon pain. But, we now know that the inflammatory stage is much shorter and less commonly the cause of tendon pain than traditionally believed. For more on this, see the below referenced Jill Cook research.
.
Lifter’s Guide to Tendinopathy Tendinopathy?
Now, the important question: How do we treat this?!
First, things we need to think about:
Where are we now – What is our baseline pain and function? How much load/volume can we tolerate?
What are our goals – What athletic demands of the sport or activity are we trying to get back to?
How are we going to assess progress?
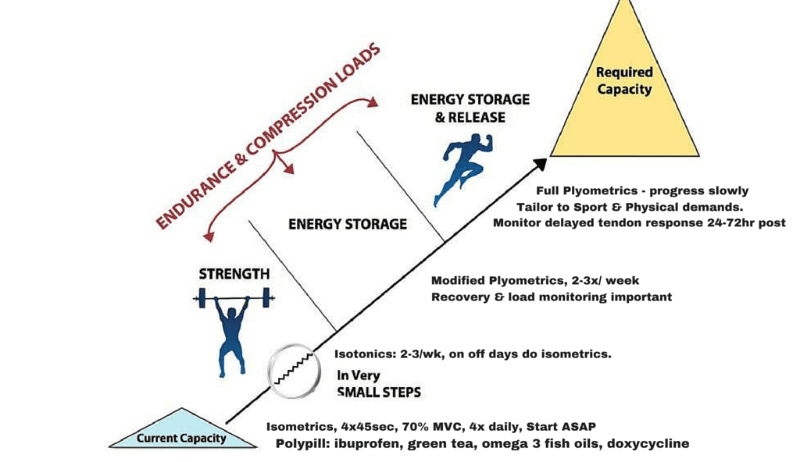
Once again, Dr. Jill Cook comes to our rescue. Self-reported pain is going to be the guide during the treatment of tendinopathy. It is the only indicator (in most cases) that something is wrong, and is clinically the most effective way to assess progress. Keeping that in mind, we use a 4 Stage Model to gradually load the tendon and get the patient back to their end goal or activity.
.
.
Remember: We need to be prescribing an appropriate load to tendons. Whether that means INCREASING or DECREASING load, that is a load prescription.
WITHOUT PROPER LOAD MANAGEMENT TENDON REHAB BECOMES MUCH HARDER.
That does NOT mean we need to stop training! Remember decreasing training volume can also be an injury risk factor. See the following articles for some exercise ideas that will allow you to train while rehabbing:
Squat Variations to Fix Your Problem Areas
.
PHASE 1: Isometrics
When athletes develop tendinopathy, pain levels can be widely varied. It is very common for tendinopathy to cause high levels of pain (which I consider to be anything more than a 6 out of 10, with 10 being the worst pain imaginable). When someone is in this much pain, this needs to be dealt with before any further treatment can occur. Isometrics have an immediate analgesic (pain-relieving) effect and should be used to decrease pain to a “manageable” level. The individuality of each athlete plays a huge factor in this part of treatment – each person’s “manageable” level of pain will be different. As a general rule, getting the pain down to a 2-3/10 is a good goal before progressing to the next phase. This will (probably) not happen overnight! Be patient, and focus on decreasing pain FIRST.
Perform 45sec Isometric Hold x 4-5 sets. May perform this routine 2-4 times throughout the day, depending on tolerance.
Examples:
Achilles: Static Step Stance – Toes on the edge of a step, heels hanging over the edge
Patellar/Quad Tendon: Isometric Knee Extension – Different angles may be more/less tolerable
Tennis Elbow: Isometric Wrist Extension – Use weight OR other hand to provide resistance
.
PHASE 2: Isotonics – Heavy and Slow
After we get the pain down to a 2-3/10, the next phase in tendinopathy treatment is to gradually LOAD the tendon. Unfortunately, pain will be the best way to assess the loading strategy during this phase, as well. We need to SLIGHTLY INCREASE pain in the tendon to ensure we are loading enough to cause a healing response, without aggravating it too much and causing a setback. Greg Lehman puts it best (although with slightly different wording):
We can poke the bear, but we probably shouldn’t punch it.
If we are not causing any increase in pain, we are not loading enough, and pain will persist. If we load the tendon adequately, we will get an increase in pain (for example, from a 2/10 up to a 4/10), but the pain will come back down in the next 2-4 hours. TOO MUCH load will cause a larger increase (5/10 or above) that will stay elevated for the next day or two.
Exercises we select here will be through as much range of motion (ROM) as possible, with a slow eccentric phase and also a slow concentric phase (because loading doesn’t just happen in one direction). Keeping the pain principles in mind, we want to load the tendon up appropriately.
Perform 6-8 reps, x 3-4 sets. This should be done 1x per day, allowing 24 hours to assess the tendon’s tolerance to load.
Note: This phase may take 8-12 weeks, so once again, BE PATIENT! What you will see is the athlete beginning to tolerate heavier and heavier loads, using more complex and sport-specific exercises, while keeping pain levels low.
Side note: in cases where a treatment or a few treatments get the athlete pain free, then we weren’t likely dealing with a true tendinopathy in the first place. For tendinopathies, it takes time for the tissue structures to adapt.
Examples:
Achilles: Calf Raises (knees bent or straight) – May use a Deficit to increase ROM if tolerated. Use the other leg to assist as needed.
Patellar/Quad Tendon: Heels Elevated Squats, Single Leg Squat, or even Open Chain Leg Extension (Keep an Open Mind – Tendon loading is the goal!)
Tennis Elbow: Pronated Wrist Curls, Neutral/Pronated Bicep Curls
.
PHASE 3: Dynamic Loading/Energy Storage
Now that we have gone through the boring process of decreasing pain and slowly increasing the tendon’s load capacity, it’s time to start adding in some fun stuff. Tendons are mainly inert tissues and can be compared to springs that allow our bodies to absorb and quickly display large amounts of force. The goal of this phase is to start incorporating this aspect of tendon loading into the program – think of these exercises as very light, low-intensity plyometrics.
Perform these 1x every 2-3 days, alternating days with the strengthening program from Phase 2. Only add in one exercise at a time to assess tolerance to that exercise. The goal here is 3-4 exercises, 2-3x per week, with Heavy/Slow strengthening an additional 3-4x per week.
Examples:
- Achilles: Stair Climbing on Toes, Line Hops with knees straight, Jumping Rope, Single Leg Hops.
- Patellar/Quad Tendon: Quarter Squat Hops (low amplitude), Jumping Rope, Line Hops with knees bent
- Tennis Elbow: Ball Drop and Catch, BodyBlade
.
PHASE 4: Sport Specific Plyometrics
FINALLY, the fun part! It’s time to start adding in plyometric exercises and drills to prepare the athlete for return to sport. To begin this phase, it is essential that they have been tolerating the progressions in Phase 3 with no significant increase in pain.
When possible, these drills should initially look very similar to those being done at the end of Phase 3 to allow for a seamless transition. Adding intensity or amplitude can be an easy way of progressing those exercises, as long as the athlete can tolerate it. During the progression of this phase, each workout should be followed by 24-48 hours of rest to assess tendon tolerance.
Examples:
Get creative here, and let the demands of the individual sport guide exercise selection.
.
THE AUTHOR
Sean Jacobs is a Doctor of Physical Therapy from Wingate University, graduating in December 2017. He is currently a CrossFit Level2 Trainer and has been coaching CrossFit and weightlifting for 6+ years. In addition to finishing PT school, Sean competes in local weightlifting, powerlifting, and CrossFit competitions.
.
References:
- Cook JL, Purdam CR. Is tendon pathology a continuum? A pathology model to
explain the clinical presentation of load-induced tendinopathy. Br J Sports Med
2009;43:409–16.
- Gabbett TJ. The training-injury prevention paradox: should athletes be training smarter and harder? Br J Sports Med. 2016;50(5):273-280.