The front rack can be a very challenging position for many athletes to get into. And without a solid front rack, the Olympics lifts, front squats, and even overhead pressing become significantly harder to perform. Then, with repeated workouts involving those movements, pain begins to creep in making the rack position even more difficult.
Quite often pain begins in an athlete’s wrist but more often than not we find the wrist isn’t the source of the issue. If mobility is lacking in other joints involved in the front rack then the wrist ends up picking up the slack. The result is the wrist becomes painful
So if you’re front rack is limited causing performance and/or pain issues then taking the time to determine what is holding your front rack positioning back is the key. Below I’ll break down testing the joints involved in the front rack as well as share some of my favorite mobility drills.
For more help improving your mobility, access our FREE mobility checklist!
FRONT RACK MOBILITY TESTS
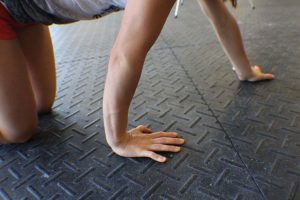
Wrist Flexion
To test wrist mobility, start with your hand flat on the ground with the elbow extended. Move your upper body forward and see how far over your fingers your shoulder can get. We should be able to get the forearm to being positioned vertically above the wrist joint. If not, wrist mobility will need to be addressed with either soft tissue work or joint mobilizations. See THIS ARTICLE for some great exercises to use.
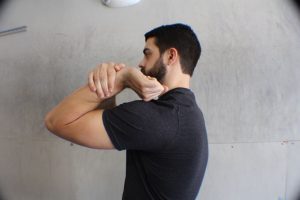
Elbow Flexion
Up next, we need to look at how much elbow mobility you have. While giving yourself a bit of overpressure, test if you can get your knuckles to contact your shoulders.
Some with larger biceps and forearm muscles will be limited by soft tissue approximation and will need to make up for their lack of elbow flexibility with increased shoulder external rotation.
Shoulder Mobility
I always start with shoulder mobility by looking at external rotation. Begin with your elbow positioned directly in front of the shoulder and then see how far from vertical the arm can get.
You should be able to move at least a few degrees past vertical. If you lack elbow flexion in the above test, then you’ll need to go further.
After external shoulder rotation is the flexibility of the lat muscles, begin lying flat and assessing shoulder flexion with legs down. Now compare with the hips flexed to 90 degrees (shown below). If overhead mobility is decreased when the hips are flexed, then lat flexibility needs to be addressed.
https://www.instagram.com/p/BL_dimzhHoF/
Thoracic Mobility
The final piece of the puzzle to fix your front rack is to assess thoracic rotation. Begin on knees with toes on the ground. Sit back so that your bottom is on your heels. Place one forearm on the ground and the other hand on the lower back. While maintaining a flat forearm, rotate as far towards the up hand as possible. The shoulders should create a 50-degree angle relative to the ground if thoracic rotation isn’t limited.
FIX YOUR FRONT RACK
Now that you’ve figured out your exact limitations to the front rack, let’s discuss programming this mobility work. There are a million different mobility moves for each of the above areas, and I’m not going to cover them. Instead, I’ll give you an outline of what to do.
- Spend 1-2 minutes on each of the specified above areas that you need to address.
- After addressing the individual components, use one of the below global mobilizations for ~2 minutes.
Wrist Extension Mobilization for the Front Rack
For those who fail the wrist assessment above my go-to exercise is a banded wrist mobilization. Get a resistance band positioned low on a rig and the other end right at the wrist joint line. Rock back and forth to work on restoring wrist extension.
Dowel Shoulder External Rotation for Front Rack Mobility
For athletes needing more shoulder rotation, this dowel stretch is great. Keep your elbow directly in front of your shoulder as your other hand pulls the dowel to rotate your arm outward.
Thoracic Extensions
There are many different exercises to address thoracic mobility (see my previous articles HERE and HERE), but my favorite is the tried and true foam roller thoracic extensions. Just make sure you do it properly, as I outline in this video.
Banded Front Rack Mobilization to Fix Your Front Rack
After you’ve addressed the specific joint(s) needing mobility work, follow it up with more front rack specific drills. The following two are my favorite.
Position a barbell at the front rack height. Rest your elbow on that bar while holding one end of a resistance band in your hand. Place your foot on the other end and then push your foot to the ground to increase the degree of front rack mobilization.
Isometric Front Racks to Fix Your Front Rack
My next favorite drill is to load a heavy barbell in a rack and grab it with one hand. Squat underneath the barbell with just one hand holding and fight to drive your elbow up. Repeated with the other hand.
Related Articles:


