The Truth About Squat Depth
Here’s what you need to know
- Simply said, our Western society has lost the ability to squat. And no, just because you participate in CrossFit doesn’t leave you exempt from this list. You are just as, if not more, likely to be injured during squat emphasized movement than nearly any other athlete.
- It’s generally accepted that knee valgus during loaded strength and conditioning based exercises, along with sport-specific movements, should be avoided during athletics; that is if you want to avoid injury and maintain your orthopedic health.
- While avoiding knee valgus angles is important, the age-old cues such as “knees out” are not laws, rather a correction for specific individuals demonstrating a valgus fault. Cueing the wrong athlete in this manor can predispose injuries and lead to chronic development of dysfunctional movement patterns.
- Through the popularization of self-mobilization and soft tissue techniques, overemphasizing hip external rotation mobility has become commonplace, while hip internal rotation is often lacking in athletes, and the missing mobility ranges that are actually causing injuries.
- Enhancing hip internal rotation ranges of motion, while maintaining the ability to execute this pattern, can grossly improve your mobility, deepen your squat depth, build strength, peak performance, and decrease stress on your knees and hips – aka keep you injury-free.
THE PROBLEM WITH THE TRADITIONAL SQUAT
There is a problem in the world of fitness and athletics when it comes to the ability to coach and execute a proper squat pattern. Simply put, when it comes to squatting, there are very few and far between that are actually squatting correctly. When I say correctly, I really mean not going to exacerbate or create injuries secondary to this movement.
Over the past decade, we’ve literally taken valuable squat specific coaching cues and bastardized them to the point of no return. Not only do these cues not correct faulty movement, but because athletes and clients have been so accustomed to hearing them, the cues themselves may be exacerbating and predisposing injuries, especially in loaded squatting. In trying to avoid one aspect and region of faulty movement patterning, we’re causing injuries and mobility imbalances in other areas. We’re also robbing athletes of strength and performance. This is what we call shooting ourselves in the foot as athletes and coaches!
Stop putting yourself and your athletes in harms way every time they step into the rack, and start implementing effective forms of movement coaching into your programs. Here’s how to identify and correct shoddy squat patterns to turn the king of all lower body movements into a protective mechanism, instead of a highly injurious exercise.
MORE THAN JUST THE “PUSHING THE KNEES OUT” CUE
Knee valgus, or the inward caving of an individual’s knees during athletic movements, creates a highly vulnerable state at the knees and hips, and is one of the most important aspects of preventing lower extremity injuries for athletes. Multiple research studies have shown it to be related to a variety of injuries to the lower extremities, most notably ACL injuries and patellofemoral pain syndrome (1-6).
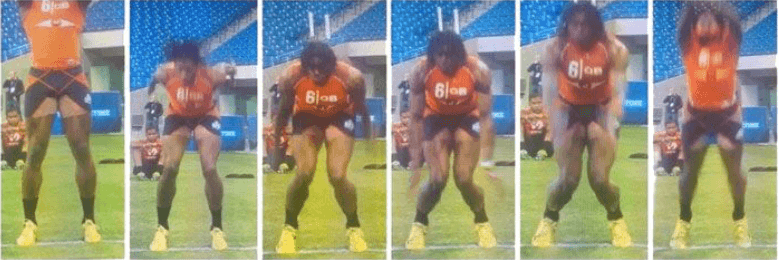
You think you’re too advanced to worry about knee collapse? Think again. Even some of the most talented and highly trained athletes in the world, such as the infamous Washington Redskins quarterback, Robert Griffin III, have become great examples of the dangers of uncontrolled knee valgus collapses and non-contact movement based injuries. During NFL Combine testing, RGIII demonstrated significant medial collapse of his knees during vertical jump testing. Several months later, he tore his ACL during a non-contact change of direction movement where his knee caved in. Unfortunately, since then, he hasn’t had much success returning to his original promise that was shown early in his career.
The Cue
Coaches, trainers, physical therapists, and strength and conditioning specialists have worked hard to correct athlete’s movement patterns because of the increased knowledge of the association between knee injuries and valgus collapse that has come out in recent years. Coaches began using cues such as “push your knees out” or “spread the ground under your feet” to teach athletes to keep their knees out as they squat, and thus, work towards retraining valgus collapse during other athletic movements.
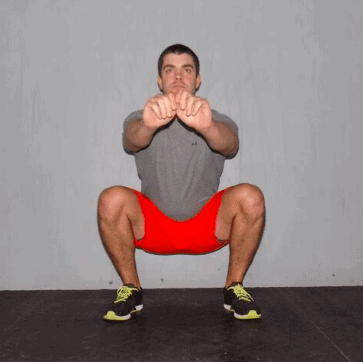
This cue worked wonders for those demonstrating a valgus collapse fault during squats and other athletic movements. It helped many athletes learn how to properly squat. During a proper squat, an athlete maintains weight on their heels with their feet flat on the ground, descend to full depth, maintain a neutral spine, and their knees tracked directly over their feet (avoiding valgus collapse). Check out the picture below to appreciate what position I’m speaking to here.
As with most things in the fitness industry, the pendulum has now been swung too far in the opposite direction. Rather than being a CUE for correcting a movement FAULT, “knees out” has become a squat RULE in the eyes of many in the fitness community.
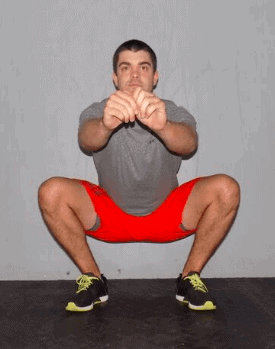
Many coaches now tell ALL athletes to always push their knees out into an externally rotated hip position, not just the athletes demonstrating the valgus fault. The result of misuse of this cue is that we now have athletes pushing their knees far outside of their feet as they squat. We can thank the popularization of the knee out cue that ran through the CrossFit community years ago to fellow physio and strength coach, Dr. Kelly Starrett. This cueing mechanism from one of the brightest minds in the industry wasn’t originally designed to be implemented for everyone, but rather a select few that needed the “knee out” reminder to improve the squat pattern. Here’s what a K-Starr style squat looks like below.
POOR SQUAT MECHANICS PRESIDPOSE INJURIES…DUH!
As a physical therapist and CrossFit coach, I’ve noticed this trend begin to result in some lateral injuries to the knee in some of my CrossFit athletes. I’ve also seen athletes spend countless hours stretching their hips further and further into hip external rotation in an attempt to allow them to push their knees out even farther as they descend into the bottom of a squat.
I’ve seen an increased number of athletes, after adopting this type of “knees out” squat pattern, developing posterolateral knee instability as a result of their excessive outward pushing of the knees over their feet. (Note: I do still see more valgus related injuries, but this knees out pain crowd is growing).
It takes some serious discussion to convince these athletes that this excessive knees out squat pattern isn’t the best thing for their knees when this has been so indoctrinated into their mindset by coaches and internet articles and videos…and well popular New York Times bestselling books. They instead want to focus on crazy mobility movements to the quads, IT Band, and hips. However, re-working their squat technique to being performed with the knees remaining over their feet relieves the majority of knee pain symptoms while squatting and jumping.
While externally rotating the hip as an athlete squats will put the hip complex in a better position to squat deeply, this overemphasis has led to other dysfunctions in the athletes I work with. I also see lots of individuals complaining of hip impingement while they squat. This anterior hip feeling of “pinching” is somewhat relieved when they perform external rotation mobility work to their hip, but it returns by their next workout. These athletes feel they must constantly mobilize into hip external rotation and always push their knees further and further out (into hip external rotation) in order to decrease their hip impingement symptoms. They waist 10 minutes of their day stretching their piriformis, mobilizing the hip joint, and rolling around on foam rollers.
With a large number of these athletes, I’ve found hip internal rotation motion to be the more restricted mobility component in their hips. Furthermore, regaining hip internal rotation often results in immediate improvements in their symptoms, increased squat depth, more strength, and mobility improvements that last much longer (especially when compared to their daily need to mobilize into external rotation).
ASSESSING HIP INTERNAL ROTATION MOBILITY
For athletes with anterior hip pinching while squatting, assessing hip internal rotation mobility is best performed with the hip flexed to 90 degrees. I prefer to assess this with the athlete lying on their back, their thigh vertical, and their kneecap directly above the hip joint. While maintaining this knee position, the athlete’s hip is internally rotated by moving the foot outward. Rotation is ceased as soon as tightness is felt within the hip joint, or when movement is observed in the pelvis or low back.
Ideally, approximately 30 degrees or more of internal rotation should be available in this position. But in our current day reality, I routinely evaluate CrossFit athletes with as little as zero degrees of hip internal rotation on almost a daily basis!
The staggering number of athletes demonstrating this mobility restriction is truly amazing. In my practice, it is the second most common restriction I see in fitness athletes behind ankle mobility limitations.
While not always the case, many of these athletes are fortunate in that I’ve found hip internal rotation mobility to be a quickly responding movement, providing just as fast of results in the athlete’s symptoms and performance.
TREATING HIP INTERNAL ROTATION
My first course of action for improving hip internal rotation is 90/90 breathing. This breathing technique works to move the pelvis into a more neutral position. A large number of athletes tend to live in an overextended position. By this I mean that their lower back is hyperextended and their pelvis is in an anteriorly tilted position. Working back towards a more neutral pelvis will put the hip socket in a more optimal position to move into hip flexion and internal rotation. This will allow the athlete to achieve better squat depth.
To perform this exercise, have the athlete lie on their back with feet on a wall. Knees and hips should both be flexed to ninety degrees with the thighs vertical. He or she should put one hand on their stomach and the other on their chest. The athlete begins by lifting his or her hips off the floor about one inch. Encourage a deep breath in through the nose, filling the stomach with air, before allowing the chest to rise.
This encourages getting the diaphragm more involved in the breathing process. During the exhale, the athlete breaths out through their mouth and pushes their ribcage down. This results in an abdominal contraction pulling the pelvis into a more neutral position. I have athletes breath in this manner for two minutes prior to a workout. For some, once this initial progression is mastered, I progress them to lifting one foot off the wall, and repeatedly internally rotating the hip as they perform the exercise.
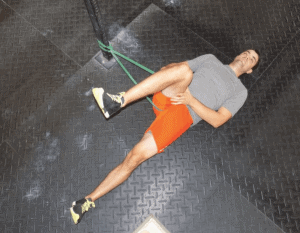
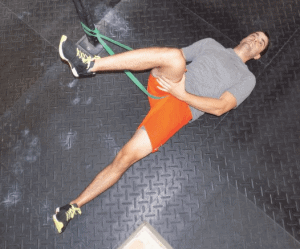
Next, I have the athlete perform some band distraction of the hip joint and then self mobilize into internal rotation. With one end of a medium-strength resistance band attached to a rack, the athlete lies on their back, with the other end of the band as close to his or her hip joint as possible. Their thigh is vertical and the athlete repeatedly moves their foot outward to internally rotate the hip. Often times, mobility improves quicker if they grip their thigh with their hands to help rotate the hip further, or if they wrap their thigh with compression bands like the Edge Mobility Bands by The Edge Mobility System, which is my personal favorite.
Starting Position:
Ending Position:
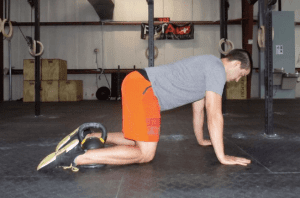
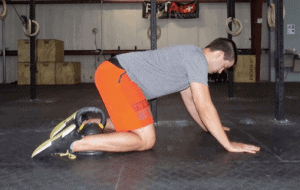
Before retesting their squat, I like to have the athlete perform some quadruped rocking to move the hips through a squat-type pattern in a lesser-loaded position. The athlete begins on all fours with a weight inside of their feet, which blocks their foot from moving inward into an externally rotated hip position. The athlete is instructed to maintain neutral spine positioning as they rock backwards into deeper hip flexion. The movement is terminated when the lower back starts to round or when any tightness or pinching is felt in the hips.
Quadruped Rock Back – Starting Position:
Quadruped Rock Back – Ending Position:
After completion of quadruped rocking, the athlete returns to upright and retests his or her squat. The retrained hip internal rotation and neutral pelvis positioning often results in an immediately improved squat depth, and a less “pinching” feeling in the hips.
In athletes with hip internal rotation restrictions, this sequence of exercises will often become a temporary staple in their warm up until internal rotation range of motion is improved enough that they are no longer symptomatic, and hip mobility is stable and increased.
In some athletes, performing hip internal rotation mobility work will help, but these gains will be very short lived. In this case, I have the athlete perform side planks as shown in the video below, which will often improve their mobility as well.
RESULTS OF IMPROVED HIP INTERNAL ROTATION
Improving hip internal rotation has had dramatic effects on my performance. During a two-month period where hip internal rotation was the main focus of my mobility work, I added twenty pounds to my clean. In the six months previous to this, I had only gained 10 pounds on my clean.
I believe that improved hip mobility allowed me to be able to catch the barbell deeper in my squat th previously before, and therefore clean more weight. I also noticed significantly less symptoms of hip impingement during lifting.
If hip internal rotation is limited in you or your athletes, it is a mobility piece that can provide significant improvements in both hip and knee pain, as well as athletic performance.

