I’m excited to have my friend Brian Bouchette join TheBarbellPhysio.com to share this great video discussing anthropometry and how it can impact squat performance. If you want to have an in-depth knowledge of squat performance then this is something you need to understand!
Dr. Brian Bouchette explains how body dimensions, or anthropometry, affect squat mechanics, focusing on the impact of torso, femur, tibia, foot, and ankle positioning. The model illustrates how variations in limb length and positioning influence squat form, load distribution, and muscle activation.
Key aspects include:
- Femur Length: A longer femur pushes the hips up and back, increasing the hip moment arm and making deeper squats more challenging.
- Tibia Length: A longer tibia allows for a more upright torso, forward knee positioning, and easier depth in squats.
- Bar Position: Higher bar placement mimics a longer torso, promoting an upright torso as used in Olympic lifting. A lower bar position, common in powerlifting, creates a more inclined torso, engaging the posterior chain more.
- Heel Elevation: Elevating the heel (e.g., with weightlifting shoes) shifts the knee forward, increases knee flexion, reduces hip flexion, and enables a more upright torso—ideal for Olympic lifts but potentially problematic for those with knee or hip issues.
- Stance Width: A wider stance rotates the femurs outward, shortening sagittal plane distance, bringing hips and knees closer to the line of gravity, which supports a more upright tibia and torso.
Dr. Bouchette emphasizes that while this model offers valuable sagittal plane insights, real human movement includes multi-plane adaptations. An athlete’s mobility, body type, and sport-specific needs should guide choices around stance, bar position, and footwear.
Squat Anthropometry Author:
Dr. Brian Bochette is a Florida Physical Therapist
- Level 3 CrossFit Coach
- Certified Strength and Conditioning Specialist
- USAW Advanced Sports Performance Coach.
- He holds a Bachelor of Science in Human Performance from Florida Gulf Coast University, a Master of Science in Physical Therapy from Florida Gulf Coast University, and a Clinical Doctorate in Physical Therapy from the University of South Florida.
- Brian has worked as a clinician, educator, and coach and currently serves as faculty for both Keiser University and Florida Gulf Coast University.
- He is head coach and part-owner of CrossFit Thoroughbredsin Fort Myers, FL.
- Brian enjoys utilizing strength and conditioning as a tool to educate people about their bodies and help them to take control of their health.
https://www.instagram.com/brianbochette/
https://www.instagram.com/crossfitthoroughbreds/
SQUAT ANTHROPOMETRY
In this video we’re going how anthropometry, or body dimensions, influences squat mechanics. For that we have a model demonstrating the human torso, femur, tibia, foot and ankle, and the relationship between those. Before we get into it I’d like to give credit to Tom Purvis, who’s the first person that I’ve seen teach with a model similar to this and to my student, Jack Campa, who helped construct this actual model.
Now, before we start talking about anthropometry there are a few important definitions to review. First we’ll talk about the line of gravity. This vertical bar here represents the line of gravity. The force of gravity passing through the barbell towards the center of the earth. Next, a moment arm is a horizontal distance from the line of force to a joint. Here we see the moment arm at the hip, from the hip joint to the line of gravity. Here we see the moment arm at the knee, from the knee joint to the line of gravity.
The Relationship between the tibia and the torso.
What we see is that the more vertical the tibia the more inclined the torso. We also see that the more inclined the tibia, the more vertical the torso. If the moment arms at the knee and hip change as the tibia becomes more vertical. This makes the knee moment arm decreases and the hip moment arm increases. This places less stress at the knee and relatively more stress at the hip. Where the more inclined tibia, the knee has more stress and the hip and low back have relatively less stress.
Although we can’t change the femur length in an actual human, on this model we can adjust the femur length. This allows us to see what happens when two individuals with different lengths femurs attempt to squat. This individual has a relatively shorter femur and they’re in a parallel position or squat. If we were to take the same person and give them a longer femur we’ll see a few things happen. The hips are pushed up and back, this increases the moment arm at the hip meaning more torque at the hip. It also, because the hip moved up, means that this individual now has to work harder to get below parallel position often required in strength sports.
Now let’s take a look at what happens when we adjust the tibia
If I could take someone’s tibia and make it longer we’d see a few things happen. The knee is moved forward increasing the moment arm at the knee. The hips moved down and under, which actually drive the torso more upright. By having a longer tibia this individual has a more upright squat and look what happened to our hips too, dropped below the height on knee meaning it’s much easier for this individual to get to a below parallel squat.
While we cannot adjust the length of a torso in a real human, we can functionally change the length of the torso by changing the position of the bar on the individuals back. If an individual is squatting with a higher bar placement, it makes it function as if the torso were longer. If I were to take this bolt here which represents the bar placement and move it to a lower position on the back what we’ll see, first note the incline of the torso. What we’ll see is that now at a parallel position, so we’re going to drop him again to reach a parallel position.
At a parallel, flat parallel position, his torso is more inclined forward. This matches what we see in the real world where low bar back squats, the kind typically seen in powerlifting versus Olympic weightlifting, low bar back squats typically have a more inclined, full inclined torso, and use more of these posterior chain muscles and relatively less stress on the quads.
What happens when we elevate the heel.
Here we see the individual get approximately a thigh parallel position, heel flat on the ground. I’m going to take the foot segment and change it so that the heel is now elevated. This is the kind of change we would see if the individual is wearing a weightlifting shoe with an elevated heel. The change that we see going from here to here, the knee moved forward. The hip is also moved forward bringing it closer to the line of gravity.
This means relatively more stress at the knee, relatively less stress at the hip. The trunk became more upright, which is beneficial for things like front squats and overhead squats, or cleans and snatches. We also see there was a change in angle at the knee and here at the hip.
With the heel elevated we see relatively less hip flexion and more knee flexion than with the heel flat on the ground. Changing that could have implications for the person with relatively less hip flexion, that might be good for somebody say with femoroacetabular impingement. These athletes aren’t comfortable with deep hip flexion. Relatively more knee flexion, that could be good or bad, but might not be great for somebody with something like a tear in the posterior horn of meniscus who doesn’t do so well with deep knee flexion.
Selecting your shoe might be based on the joint angles that you want. It might also be based on whether your sport requires a very upright torso. Or things like back squatting and deadlifting that work just fine with a more inclined torso. A sport like powerlifting, which uses a relatively flat shoe.
Limitations of this physical model
Clearly, human beings are not fixed to a track when you squat you can move in all sorts of ways other than straight up and down unless we’re squatting on a Smith machine. However, because this vertical line represents the line of gravity, which is now relatively centered in the foot, we do have to stay close to that line of gravity with the weight of the barbell otherwise we’d lose our balance and fall over. If this line of gravity falls outside of the foot, the athlete would lose their balance and miss the lift. The heavier the lift, the more tightly the athlete needs to regulate how this barbell tracks directly over the center of their foot, or this line of gravity stays centered within the base of support.
Sagittal View
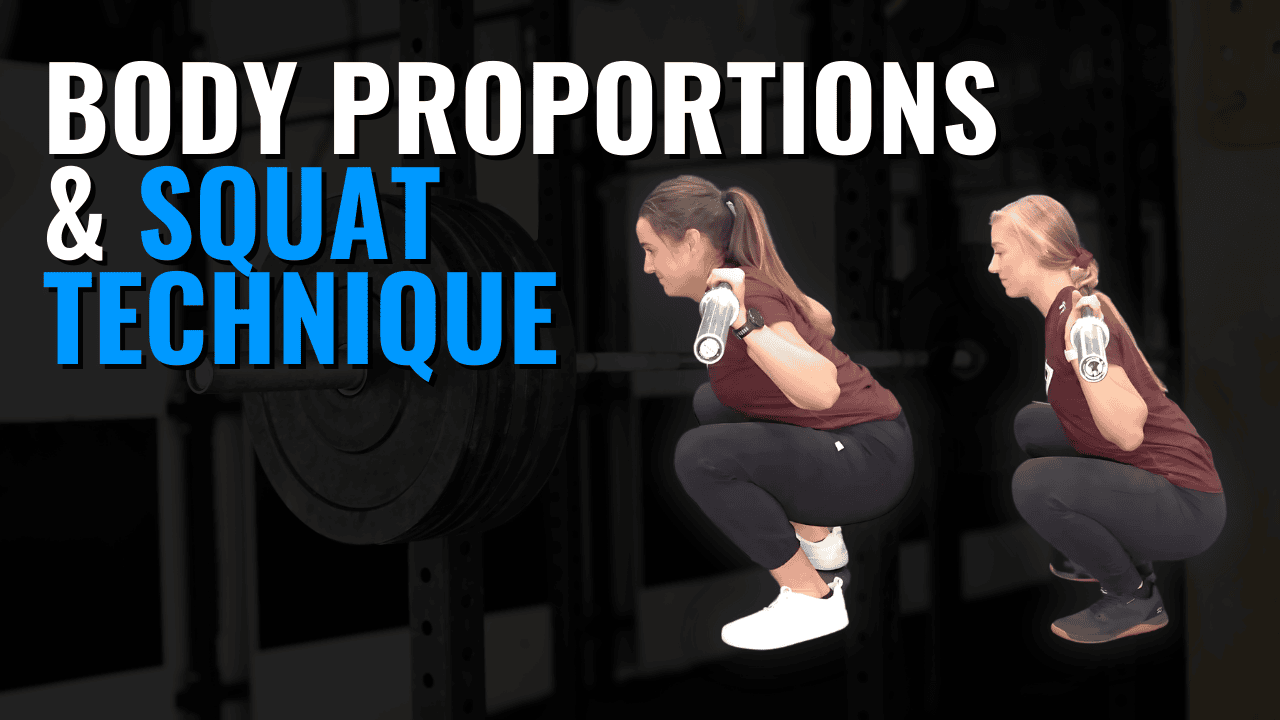
Another limitation of this squat anthropometry model is that we’re viewing it from the side. This gives us a lot of information, but it’s not a complete picture. We use a couple of separate images of a real human to take a look at how changes in squat lift can change your body positions in ways that can’t be shown with this model. Here we see two images of the same athlete squatting with two different foot positions.
On the left the athlete is demonstrating a hip-width stance. On the right the athlete is squatting with the feet positioned wider than shoulder-width. This widening of the feet causes the turning of the femur. This makes an apparent shortening in a front to back distance, or what we might call sagittal clean distance. This shortening in the sagittal plane brings the hip closer to the line of gravity that we discussed earlier and may bring the knee closer to the line of gravity as well depending on that athlete’s mobility.
An athlete with excellent ankle dorsiflexion, demonstrates a significant change in the position of the tibia. Resulting in the more upright tibia when using the wider stance.
Depending on the athletes’ mobility we’ll either see:
- a more upright tibia
- a more upright torso
- or a combination of the two when squatting with a wider stance